Clarifai 이미지 인식 서비스 사용법 (Feat. 유명인 얼굴 인식 서비스)
Clarifai는 이미지 인식 서비스를 제공하는 대표적인 회사입니다. 무료로도 꽤 많은 API를 사용해 볼 수 있습니다. 홈페이지에 방문한 뒤에 바로 모델을 사용해 볼 수 있는데요. 예를 들어 유명인(celebrity) 얼굴 인식 서비스는 다음의 경로에 방문하여 사용해 볼 수 있습니다.
▶ Clarifai 유명인 얼굴 인식 서비스: www.clarifai.com/models/celebrity-image-recognition
Analyze Images Using Celebrity Face Recognition | Clarifai
To analyze images and return probability scores, Clarifai Celebrity Face Recognition Model contains 10,000+ famous faces. Who do you look like? Try it out!
www.clarifai.com
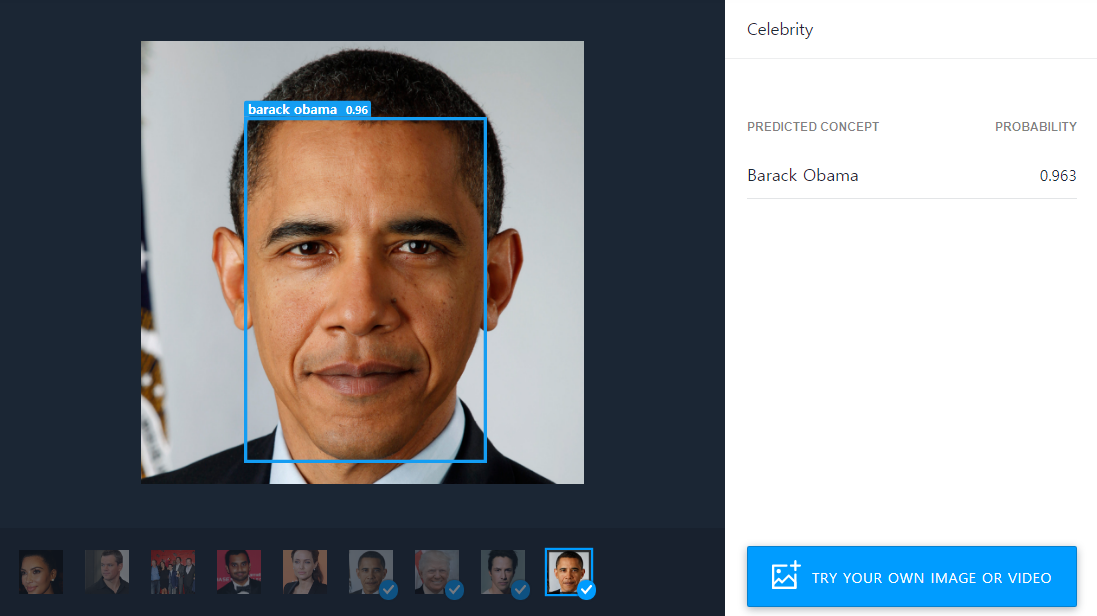
이 서비스에 접속해서 다음과 같이 이미지를 업로드하면 인식 결과 레이블(label)이 나옵니다. 저는 한 번 버락 오바마 대통령 사진을 업로드 해보았습니다. 그랬더니 다음과 같은 결과가 나오는 것을 알 수 있었습니다.

참고로 유명인(celebrity)이 아닌 일반적인 사람의 얼굴을 넣는 경우, 임의의 유명인으로 레이블링을 진행하되 낮은 확률(probability)로 분류하는 것을 알 수 있습니다.

특히 다음과 같이 확률(probability) 자체가 매우 낮은 경우에는 다음과 같이 "No celebrity detected"라는 메시지가 출력되는 것을 알 수 있습니다.

▶ Clarifai 서비스 회원가입(Sign Up): portal.clarifai.com/signup
Clarifai 서비스를 편리하게 사용하기 위해서는 회원가입을 진행하면 됩니다. 일단 저는 무료로 가입하고 무료 서비스를 사용해 보았습니다. Clarifai 서비스 회원가입 방법은 간단합니다. 이메일 인증이 필요하기 때문에 이메일 주소를 정확히 입력할 필요가 있습니다. 예를 들어 저는 다음과 같이 회원가입을 진행했습니다.

회원가입 이후에는 바로 애플리케이션(application)을 생성하여 사용해 볼 수 있습니다. 이때 API 키를 발급해 주기 때문에 발급받은 API 키를 이용해 다양한 프로그래밍 언어에서 Clarifai 서비스를 사용해 볼 수 있습니다.
※ Clarifai API 사용 방법 ※
뿐만 아니라 Clarifai는 각종 API를 지원하고 있습니다. 예를 들어 파이썬(Python)을 이용해 얼굴 인식(face recognition) 기능을 사용해 볼 수 있습니다. 자세한 내용은 다음의 깃허브 저장소에 방문하시면 확인 가능합니다.
▶ 파이썬 clarifai 라이브러리: github.com/Clarifai/clarifai-python
Clarifai/clarifai-python
DEPRECATED Clarifai API Python Client, use clarifai-python-grpc instead - Clarifai/clarifai-python
github.com
특정 URL로부터 사진 파일을 받아와 간단한 사용 방법 예시는 다음과 같습니다.
from clarifai.rest import ClarifaiApp
from IPython.display import Image, display

image_url = 'https://samples.clarifai.com/celebrity.jpg'
display(Image(image_url))

app = ClarifaiApp(api_key=API_KEY)
model = app.public_models.celebrity_model
response = model.predict_by_url(url=image_url)

regions = response['outputs'][0]['data']['regions']
concepts = regions[0]['data']['concepts']
for concept in concepts:
    print(f'Label: {concept["name"]} (Probability: {concept["value"]})')
(2022년 업데이트) 최근에는 공식 라이브러리가 Clarifai Python gRPC Client로 업데이트되었습니다. 그래서 다음과 같이 코드를 작성해야 합니다.
metadata = (('authorization', f'Key {API_KEY}'),)
image_url = 'https://samples.clarifai.com/celebrity.jpg'
display(Image(image_url))

request = service_pb2.PostModelOutputsRequest(
    model_id=model_id, # You may use any public or custom model ID.
    inputs=[
      resources_pb2.Input(data=resources_pb2.Data(image=resources_pb2.Image(url=image_url)))
    ])
response = stub.PostModelOutputs(request, metadata=metadata)

if response.status.code != status_code_pb2.SUCCESS:
    print("There was an error with your request!")
    print("\tCode: {}".format(response.outputs[0].status.code))
    print("\tDescription: {}".format(response.outputs[0].status.description))
    print("\tDetails: {}".format(response.outputs[0].status.details))
    raise Exception("Request failed, status code: " + str(response.status.code))

regions = response.outputs[0].data.regions
concepts = regions[0].data.concepts
for concept in concepts:
    print(f'Label: {concept.name} (Probability: {concept.value})')
위 코드를 실행하면 다음과 같이 사진에서 유명인 얼굴을 추출한 결과가 나오게 됩니다.

또한 다음과 같이 파일 경로(file path)로부터 이미지를 읽어와 화면에 출력할 수도 있습니다.
from clarifai.rest import ClarifaiApp
from IPython.display import Image, display

image_path = 'aligned_images/barack_obama_01.png'
display(Image(image_path))

app = ClarifaiApp(api_key=API_KEY)
model = app.public_models.celebrity_model
response = model.predict_by_filename(filename=image_path)

regions = response['outputs'][0]['data']['regions']
concepts = regions[0]['data']['concepts']
for concept in concepts:
    print(f'Label: {concept["name"]} (Probability: {concept["value"]})')
(2022년 업데이트) 최근에는 공식 라이브러리가 Clarifai Python gRPC Client로 업데이트되었습니다. 그래서 다음과 같이 코드를 작성해야 합니다.
metadata = (('authorization', f'Key {API_KEY}'),)
image_url = 'aligned_images/barack_obama_01.png'
display(Image(image_url))

with open(image_url, "rb") as f:
    file_bytes = f.read()
    request = service_pb2.PostModelOutputsRequest(
        model_id=model_id, # You may use any public or custom model ID.
        inputs=[
          resources_pb2.Input(data=resources_pb2.Data(image=resources_pb2.Image(base64=file_bytes)))
        ])
    response = stub.PostModelOutputs(request, metadata=metadata)

if response.status.code != status_code_pb2.SUCCESS:
    print("There was an error with your request!")
    print("\tCode: {}".format(response.outputs[0].status.code))
    print("\tDescription: {}".format(response.outputs[0].status.description))
    print("\tDetails: {}".format(response.outputs[0].status.details))
    raise Exception("Request failed, status code: " + str(response.status.code))

regions = response.outputs[0].data.regions
concepts = regions[0].data.concepts
for concept in concepts:
    print(f'Label: {concept.name} (Probability: {concept.value})')
실행 결과 예시는 다음과 같습니다.

참고로 API를 통해 얻은 결과는 공식 웹 사이트에 넣어서 얻은 결과와 동일한 확률 값을 내보내는 것을 알 수 있습니다.
▶ 참고 소스코드: github.com/ndb796/Clarifai-Python-Celebrity-Recognition
ndb796/Clarifai-Python-Celebrity-Recognition
Clarifai Python API: Celebrity Recognition Examples - ndb796/Clarifai-Python-Celebrity-Recognition
github.com
'기타' 카테고리의 다른 글
| SSH Key를 이용해 GitHub 계정의 저장소(repository) 코드에 접근하기 (0) | 2021.03.06 |
|---|---|
| PyTorch에서 ImageFolder와 유사한 클래스를 구현해야 할 때 사용할 수 있는 코드 템플릿 (0) | 2021.03.03 |
| 깃허브(GitHub)의 README 파일에 이미지/동영상 올리는 방법 (1) | 2021.03.01 |
| 얼굴 성별 분류(Gender Classification) 데이터셋 소개 및 다운로드 방법 (0) | 2021.02.27 |
| CelebA: 유명인(Celebrity) 얼굴 데이터셋(Face Dataset) 소개 (0) | 2021.02.27 |
